5 Pastel Gel Bundles for Creating Fun Easter Nails at Home
Spring’s sweet spot has arrived, and with it comes the perfect excuse to dip your fingertips into candy-colored polish. Pastel gel bundles are the MVP of at-home Easter manicures: they give you a coordinated palette, salon-level shine, and enough variety to layer patterns without guessing if shades will clash. Below, you’ll find five playful, wearable designs that feel fresh—not kiddish—and are totally DIY-friendly with a little patience, a good top coat, and a steady hand. Think soft gradients, whimsical florals, delicate lines, and just the right pop of sparkle.
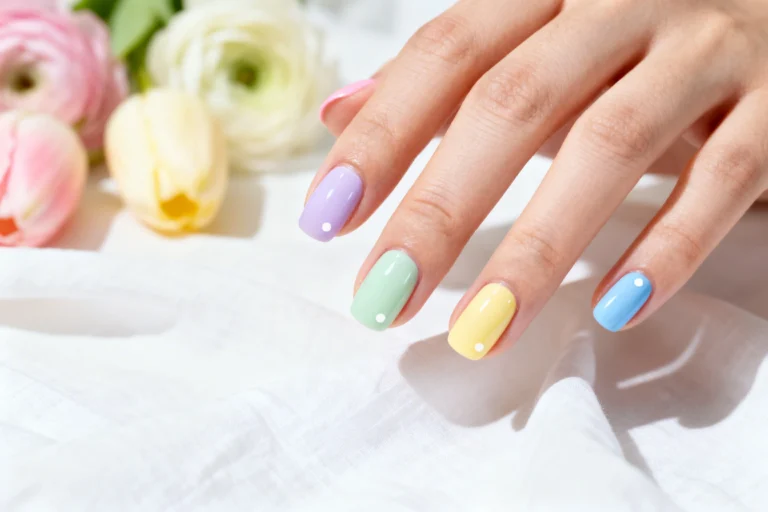
1. Candy Egg Speckle Skittles
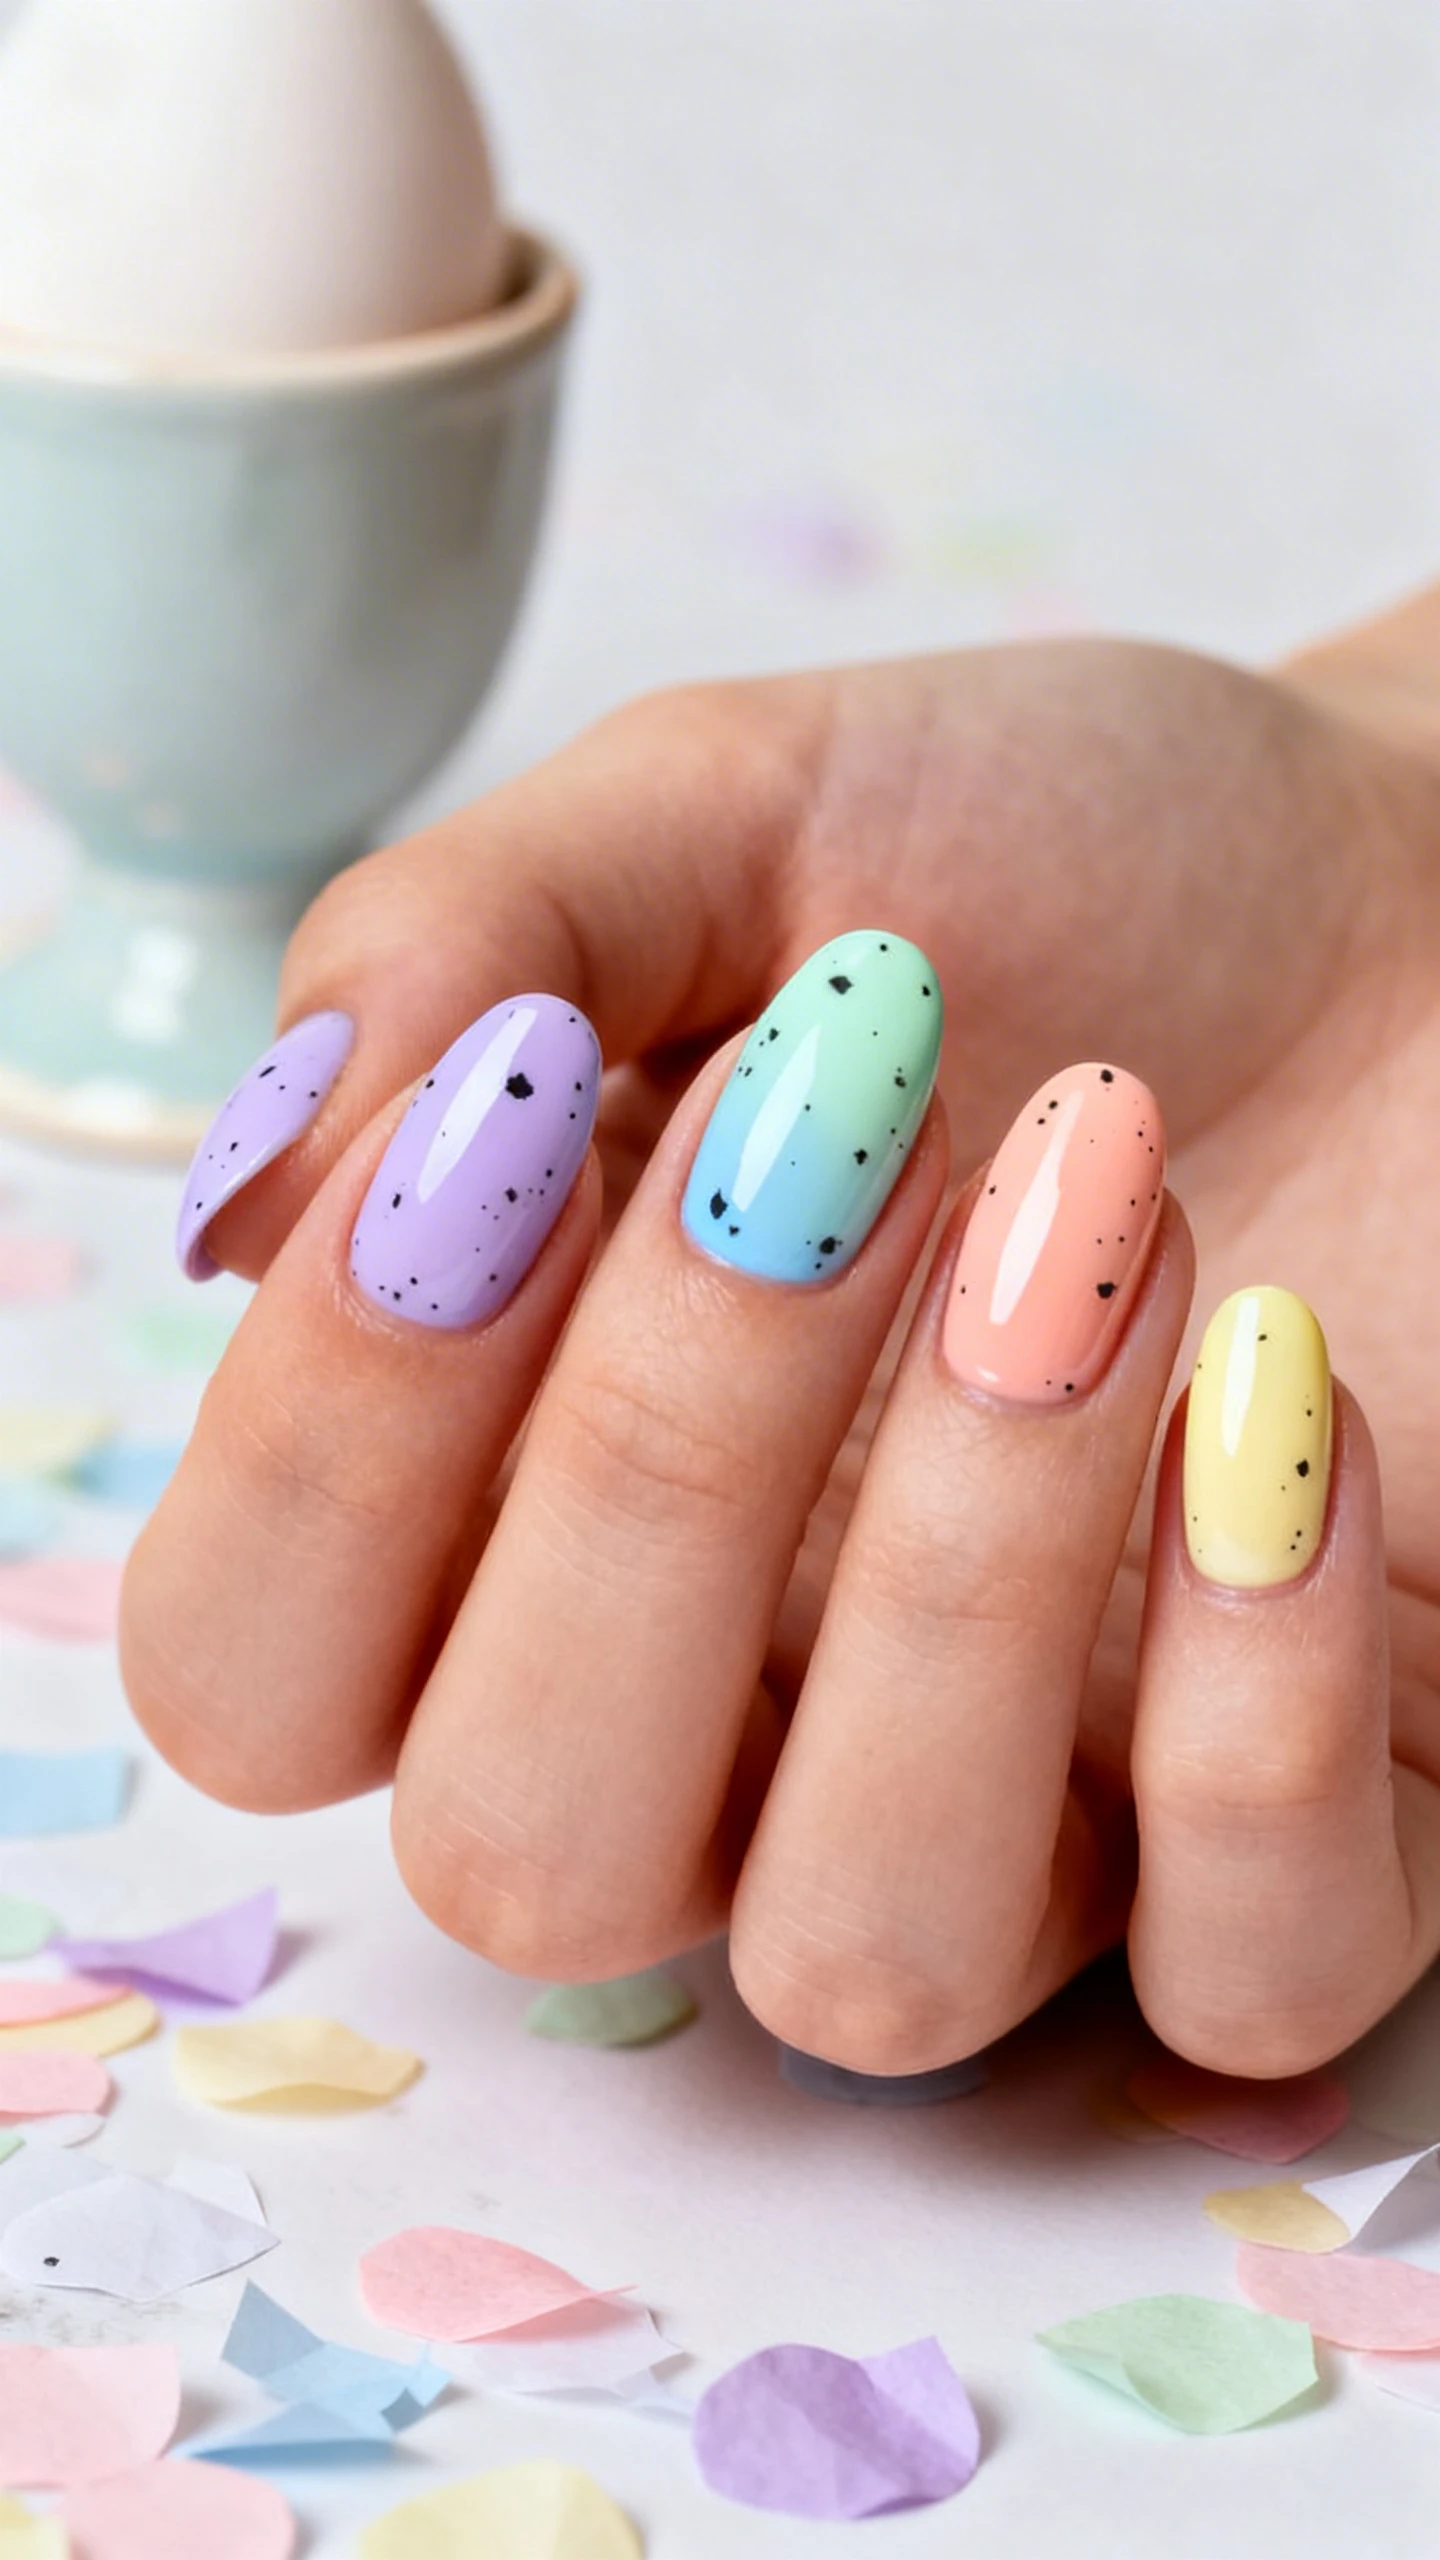
Inspired by those crunchy-shelled chocolates, this look is eye-catching yet incredibly easy to pull off. Each nail becomes a mini pastel “candy egg” with a micro-speckled finish that looks chic, not messy. Because the shades are coordinated from one pastel gel bundle, the result is cohesive even when the colors vary from finger to finger.
What makes this a crowd-pleaser is the texture play. The speckles add depth to an otherwise simple swatch of color, giving that handcrafted, boutique feel. If you’re new to art brushes, this is a confidence-boosting design—you can get a polished finish with just a dotting tool or even a trimmed makeup sponge.
Nail Details:
– Shape: Short to medium almond or soft square.
– Base colors (one per nail): pastel lilac, robin’s egg blue, soft mint, peach sorbet, and light lemon.
– Finish: Creamy gel base with a semi-gloss or glossy top.
– Pattern: Tiny, irregular speckles scattered across each nail, concentrated more toward the tip and lighter toward the cuticle for a dusted effect.
– Speckle colors: ultra-fine black and soft gray micro flecks; a few sparse white flecks for balance.
– Accent: One finger (usually ring) has slightly denser speckles for emphasis.
– Optional shimmer: a whisper of fine silver micro-shimmer mixed into the top coat on two nails to mimic a sugar-shell glow.
– Overall effect: pastel “candy eggs” with delicate black/gray/white speckles varying in size from pinpoint dots to tiny flecks, each nail in a different pastel shade.
2. Pastel French With Gingham Tips
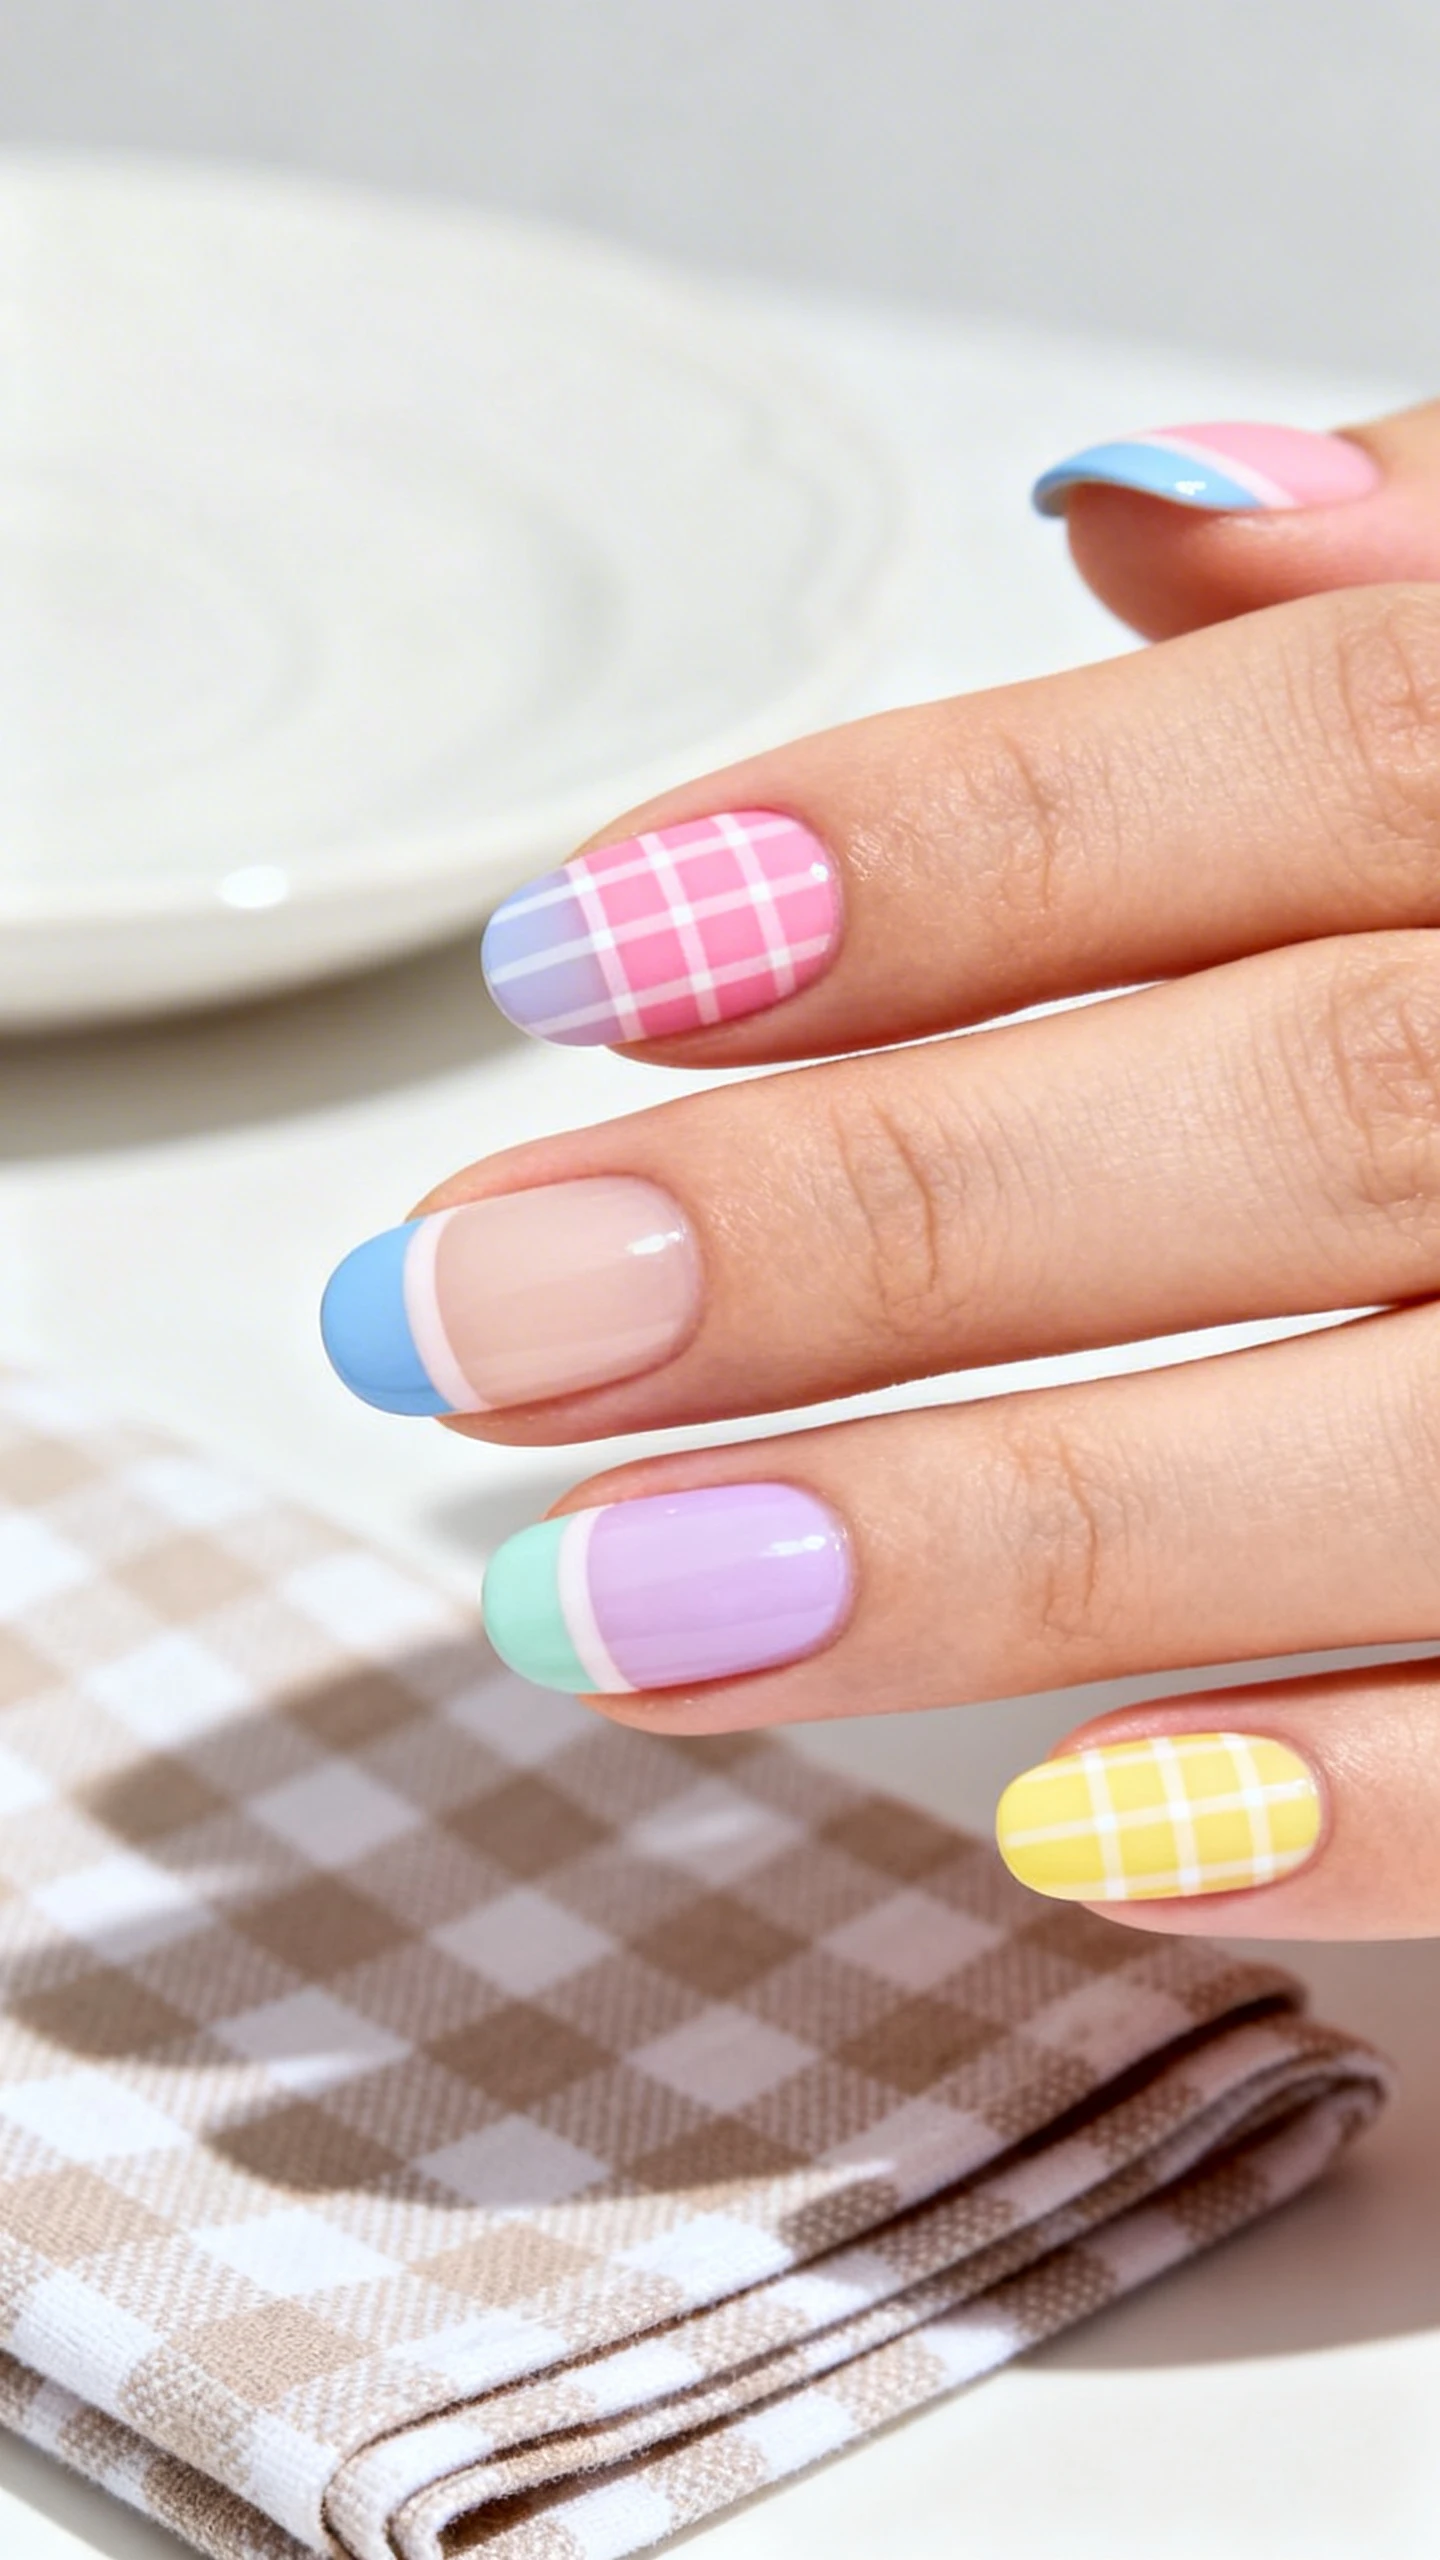
Classic French meets picnic-chic gingham—and it’s much easier than it looks. The trick is crisp lines and a thin detailing brush. Using a pastel bundle guarantees your tips coordinate, and gingham feels instantly springy without leaning costume. It’s also a great way to wear art if you prefer a cleaner canvas on the nail bed.
This is perfect for short nails and grows out gracefully. The layered checks have a soft, airy vibe that pairs beautifully with warm weather fits. If you can paint a French tip, you can make gingham—just think “thin stripes, then crosshatch.”
Pro Tip: Keep Lines Soft
Sheer pastels look best when the white stripes aren’t too opaque. Mix a drop of clear gel into your white gel to create that textile transparency.
Nail Details:
– Shape: Short round or short square for a neat, modern vibe.
– Base: sheer cream or a single thin coat of a milky pastel pink for a clean canvas.
– French tips: alternating colors across nails—powder blue, baby pink, pale lavender, mint, and lemon. Each tip width is medium-thin, following the natural smile line.
– Gingham pattern: on two feature nails (usually middle and ring), the French tip becomes a mini gingham:
– Start with a pastel tip (e.g., powder blue).
– Add two vertical white lines evenly spaced across the tip.
– Add two horizontal white lines to cross, creating tiny squares.
– Soften with a very thin sheer blue glaze over the intersections to mimic fabric weave.
– Additional accents: on one non-gingham tip, add a single, tiny silver dot at the center of the smile line for subtle sparkle.
– Finish: glossy top coat to enhance the crispness of the pattern.
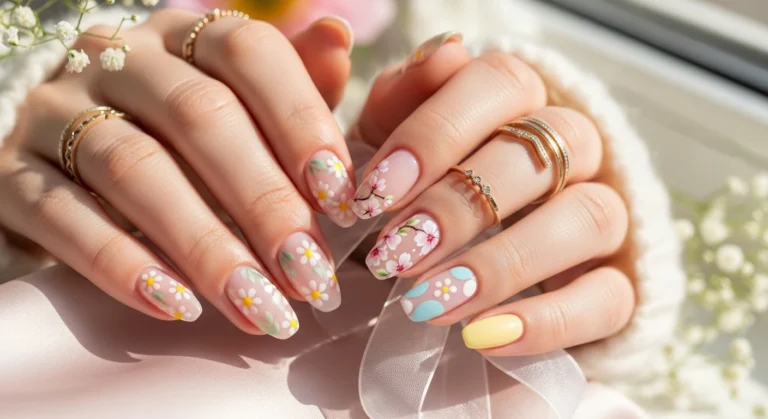
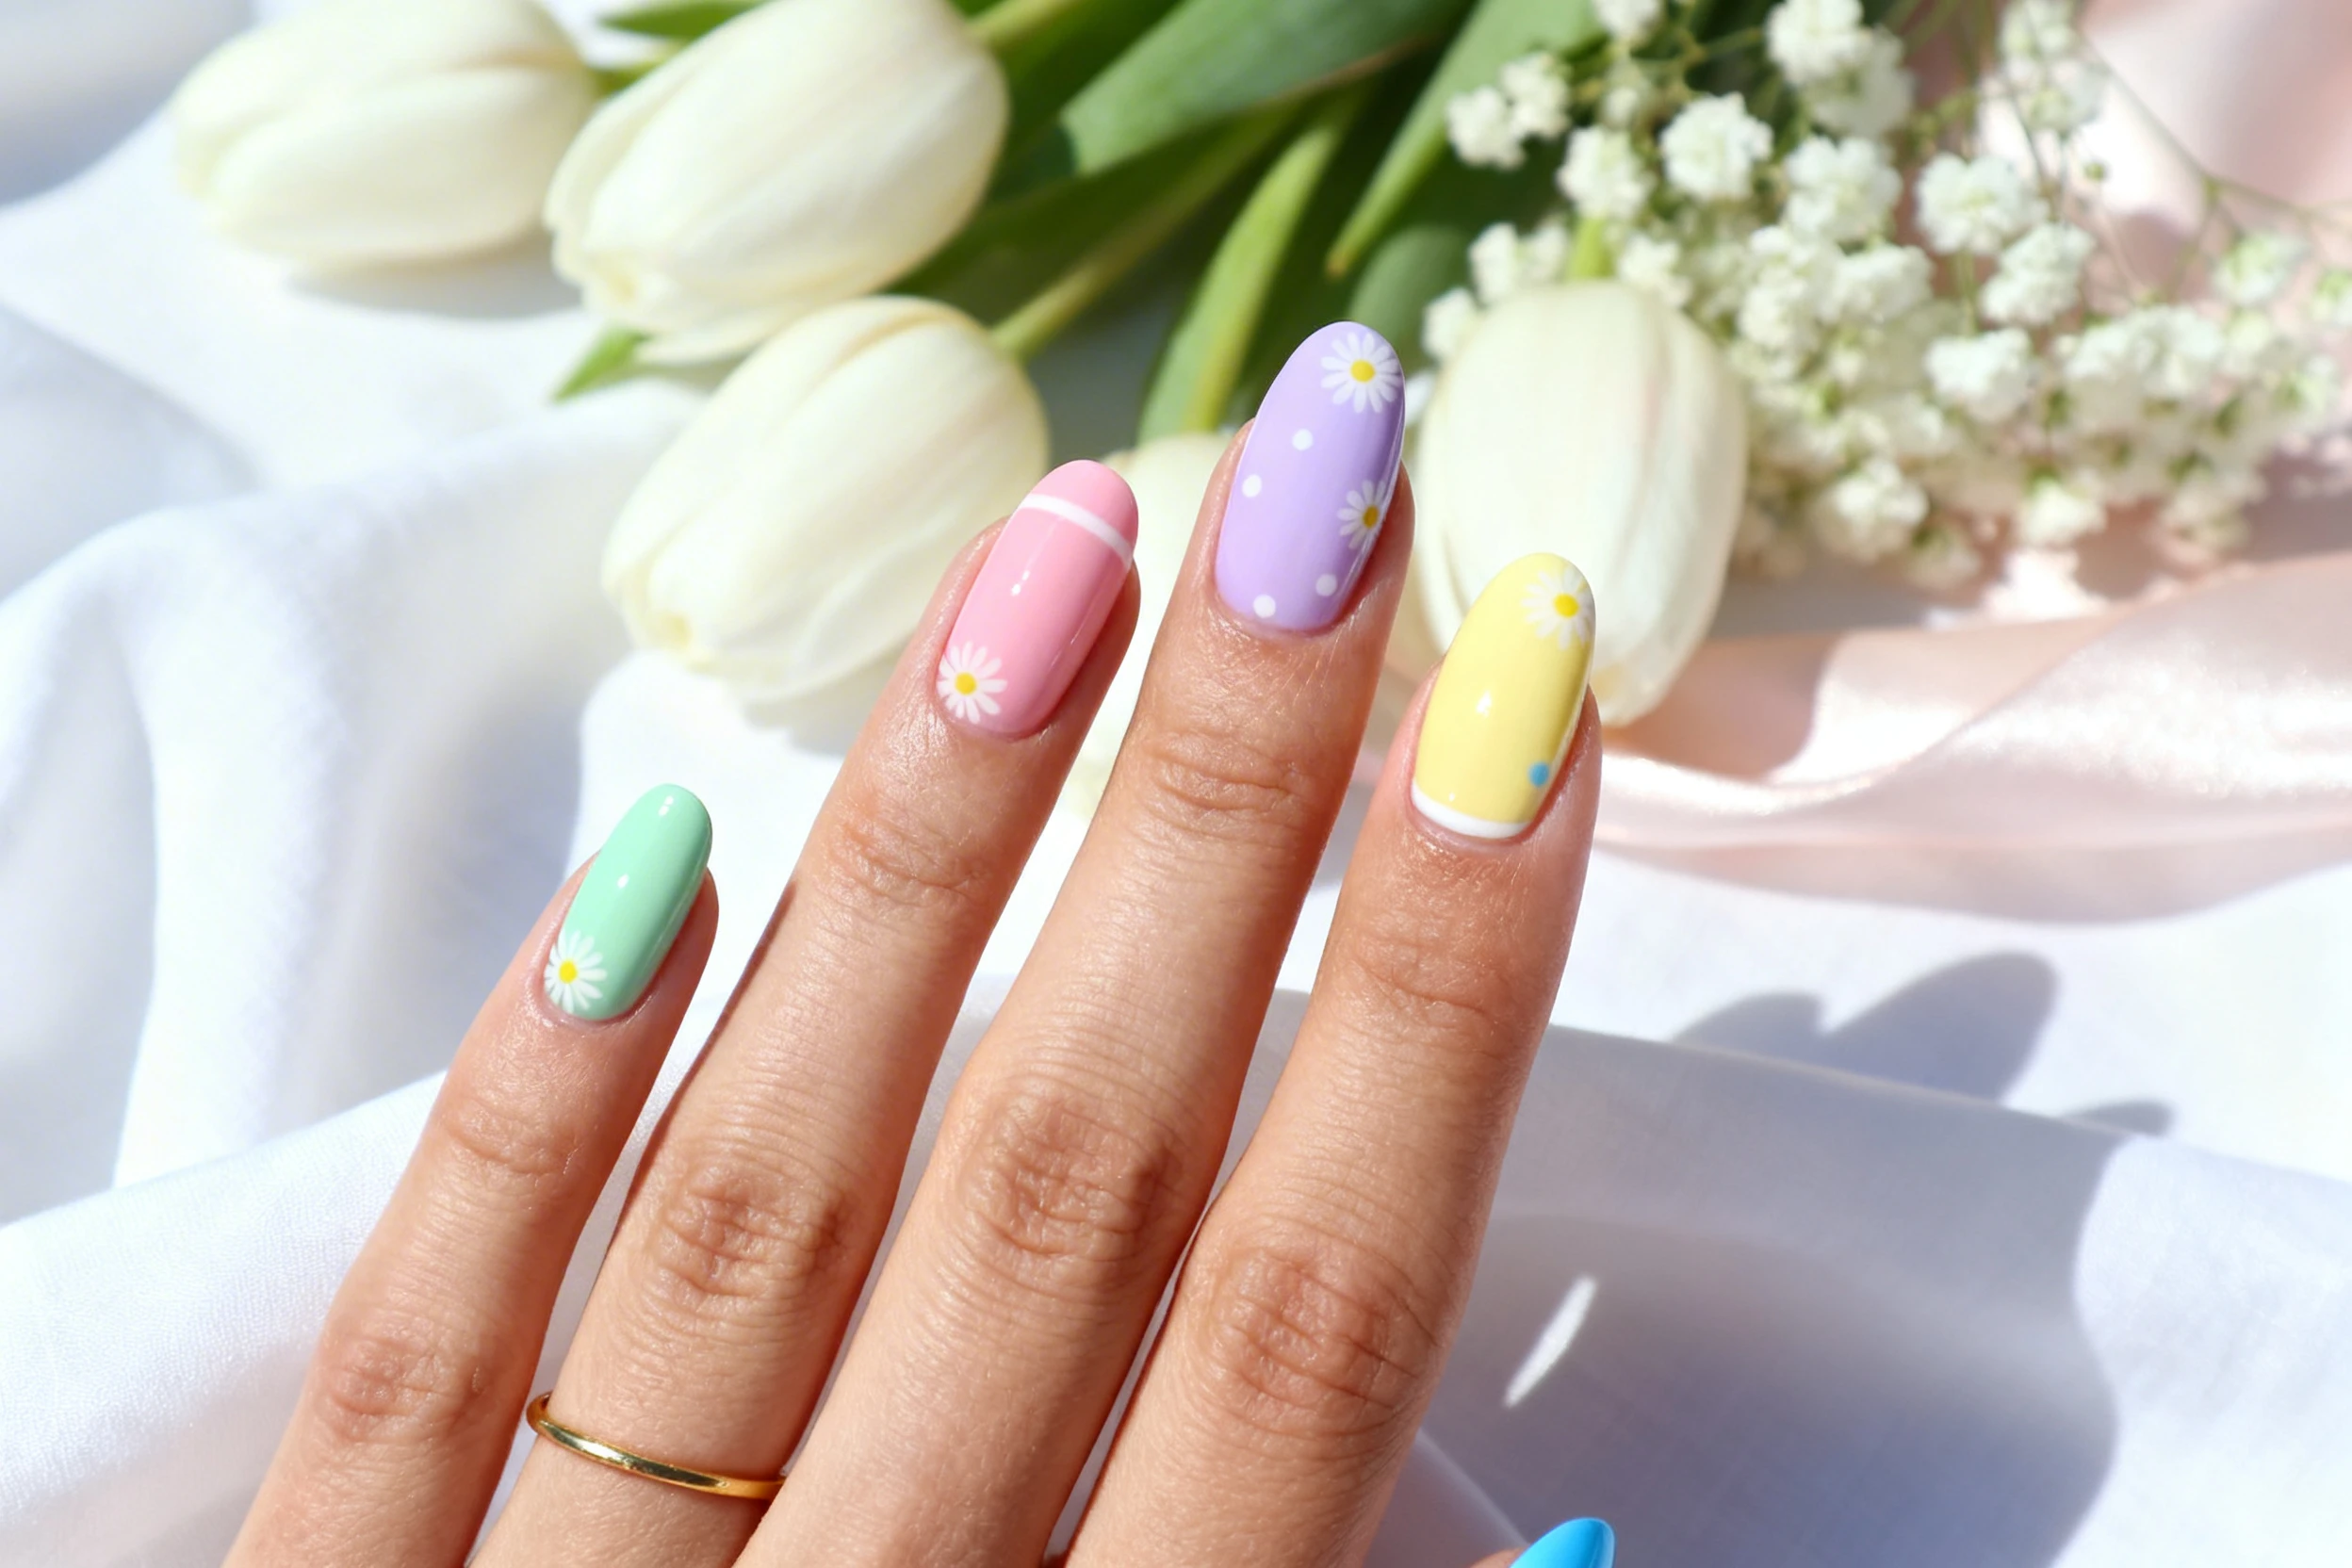
3. Blooming Meadow Pastel Florals
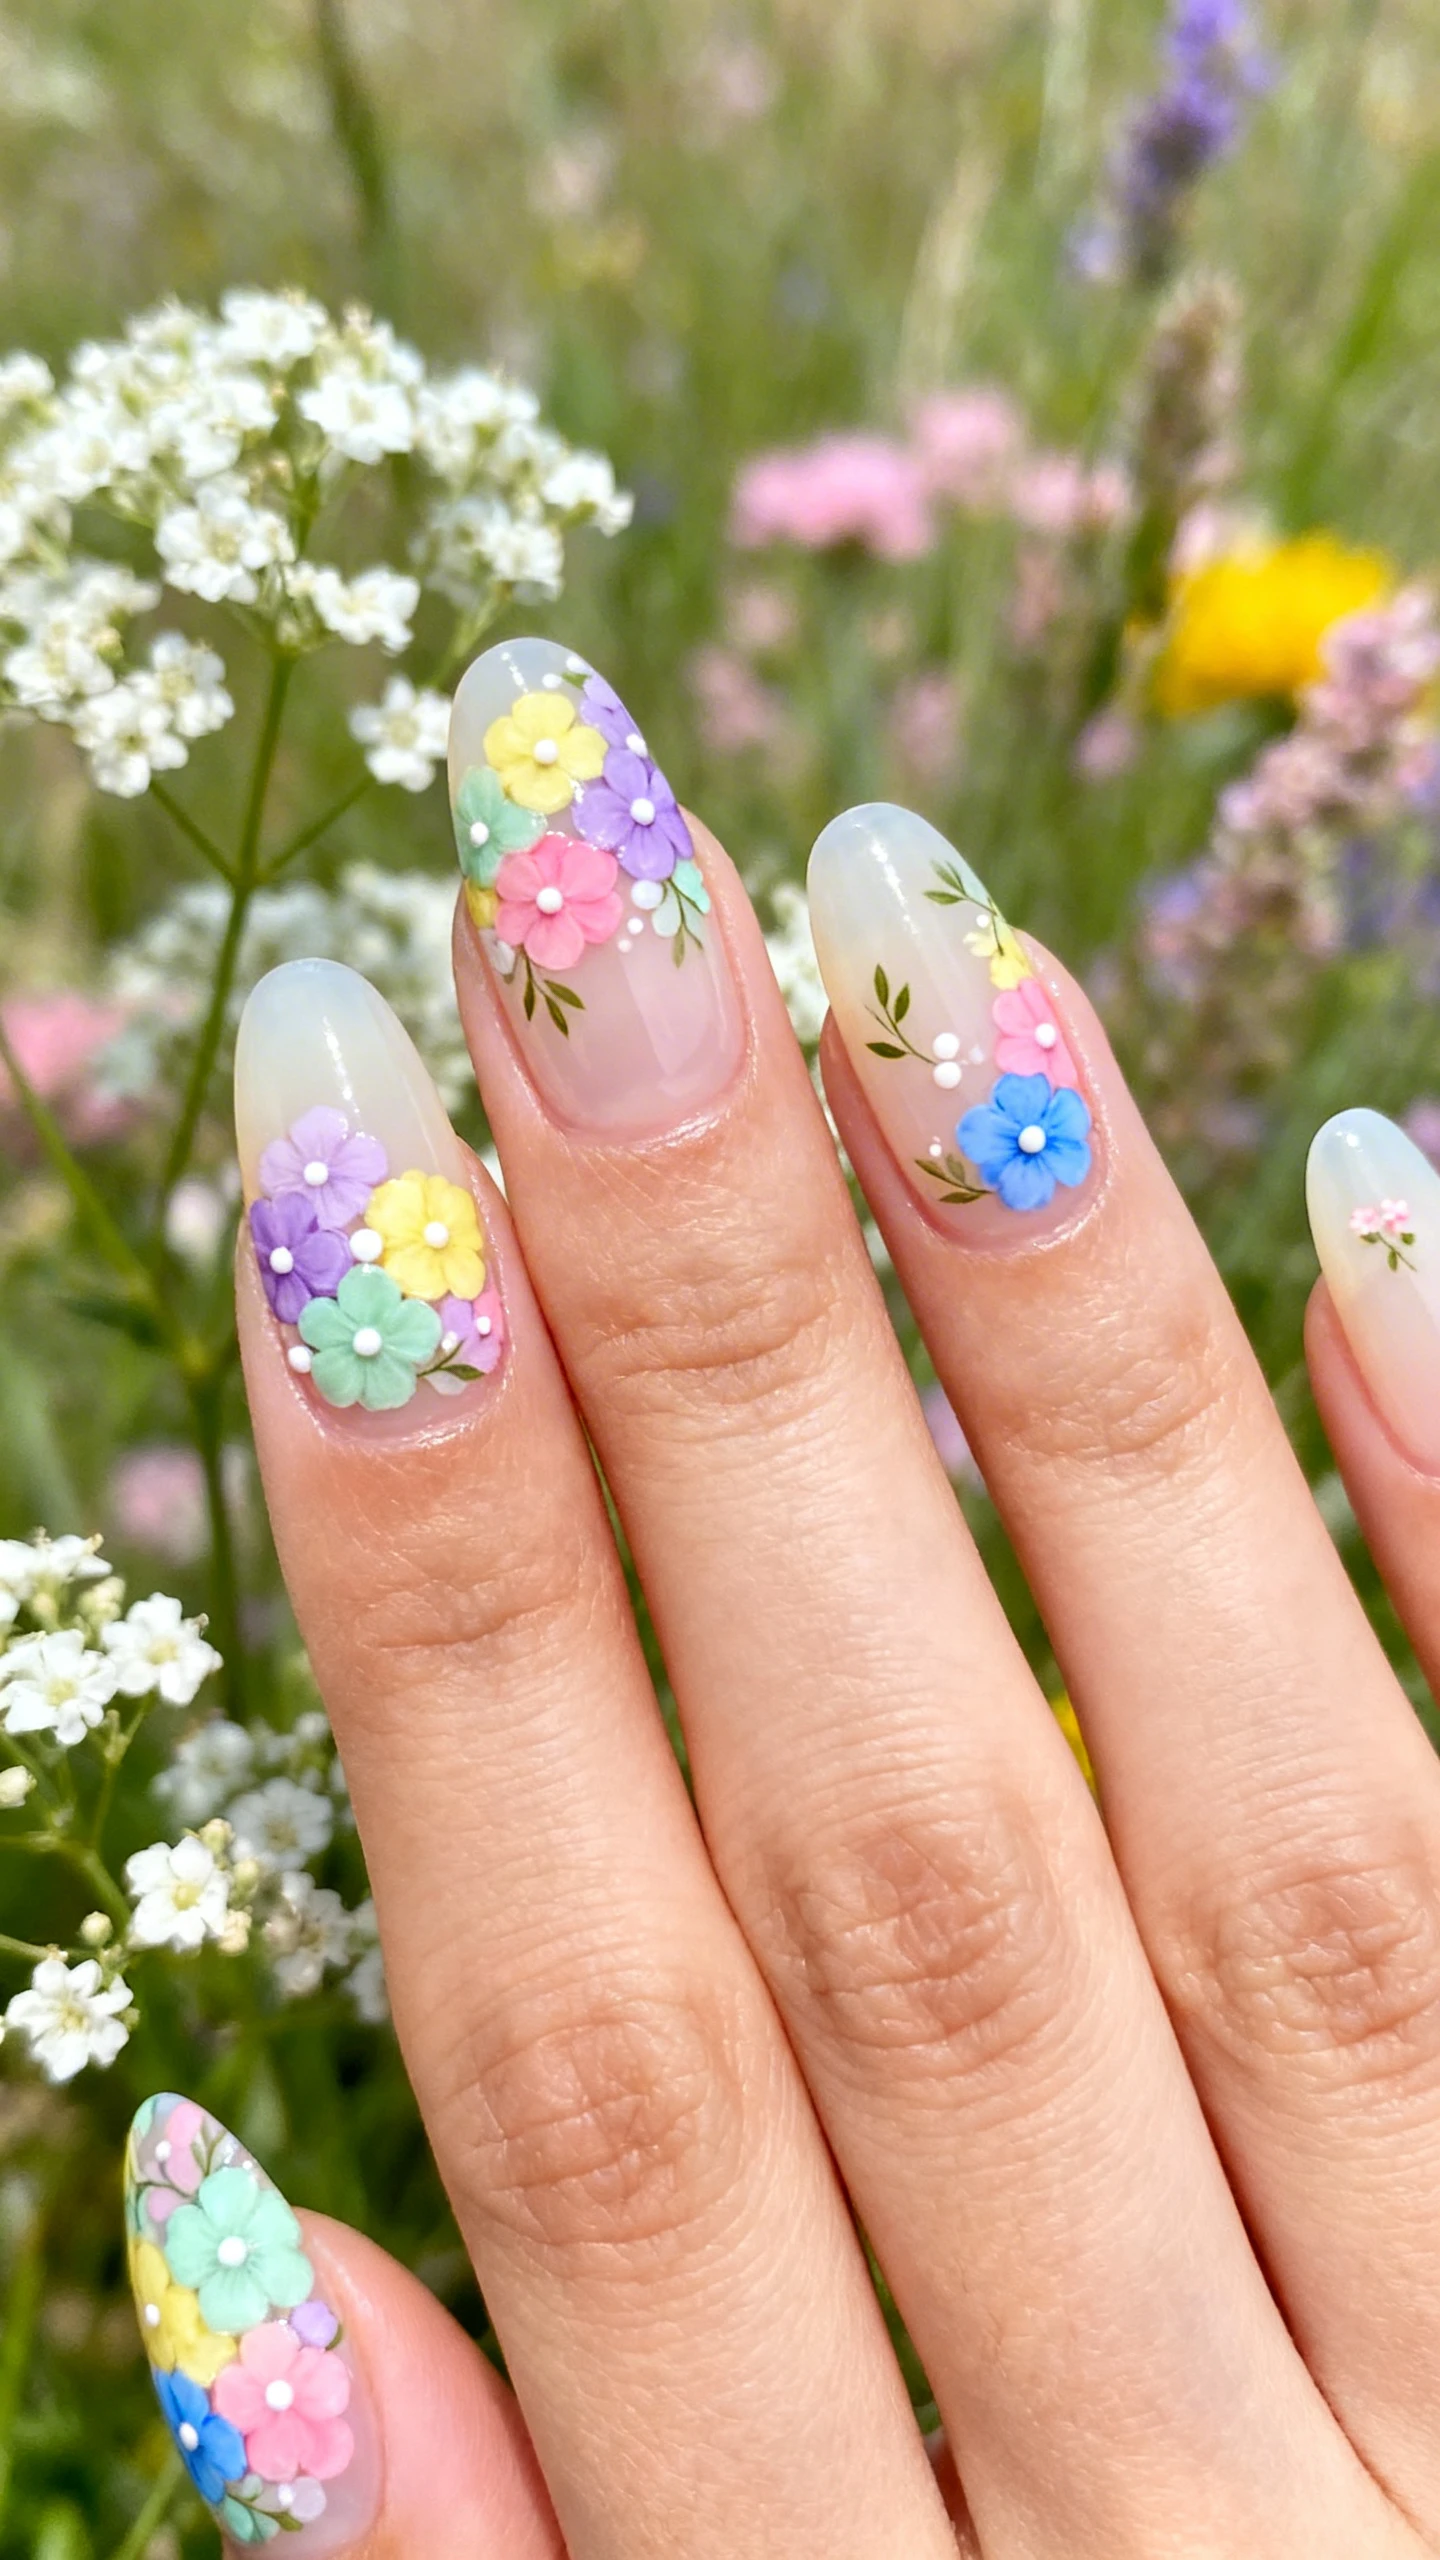
Florals for spring are timeless, but this take is airy and modern with negative space and clustered micro-flowers. It’s like wearing a wildflower bouquet—think tiny blossoms sprinkled over soft, milky backgrounds, with pastel petals and cheerful dots for centers. Choose two or three fingers to carry the denser floral clusters and keep the rest minimal for balance.
This design photographs beautifully (hello, holiday brunch selfies) and works on any nail length. Using a pastel gel bundle ensures the petal shades harmonize while still letting each flower stand out. Keep your petals slightly irregular for an authentic, hand-painted look.
How to Keep It Sophisticated
Stick to a limited palette for petals and repeat your colors across nails. Too many shades can make it look busy; three to five pastels are ideal.
Nail Details:
– Shape: Medium almond or oval for an elongated, romantic silhouette.
– Base: a sheer, milky cream jelly on all nails.
– Primary pastel palette: petal shades of lavender, butter yellow, petal pink, mint green, and sky blue.
– Floral placement:
– Index and ring fingers: clustered blossoms near the cuticle, scattering diagonally toward the tip, leaving some negative space.
– Thumb, middle, and pinky: two to three small blossoms each, placed off-center.
– Flower style: 5-petal micro-daisies (each petal is a small oval), with centers dotted in contrasting pastel (e.g., yellow centers on lavender petals). Add a couple of tiny leaf dashes in mint.
– Accents: a few micro-dots between flowers in coordinating pastel shades for a confetti feel.
– Outline/detail: ultra-thin white outline on select petals for definition, not every flower.
– Finish: high-gloss top coat to make the milky base look glassy and to encapsulate the art smoothly.
4. Sorbet Ombre Glow
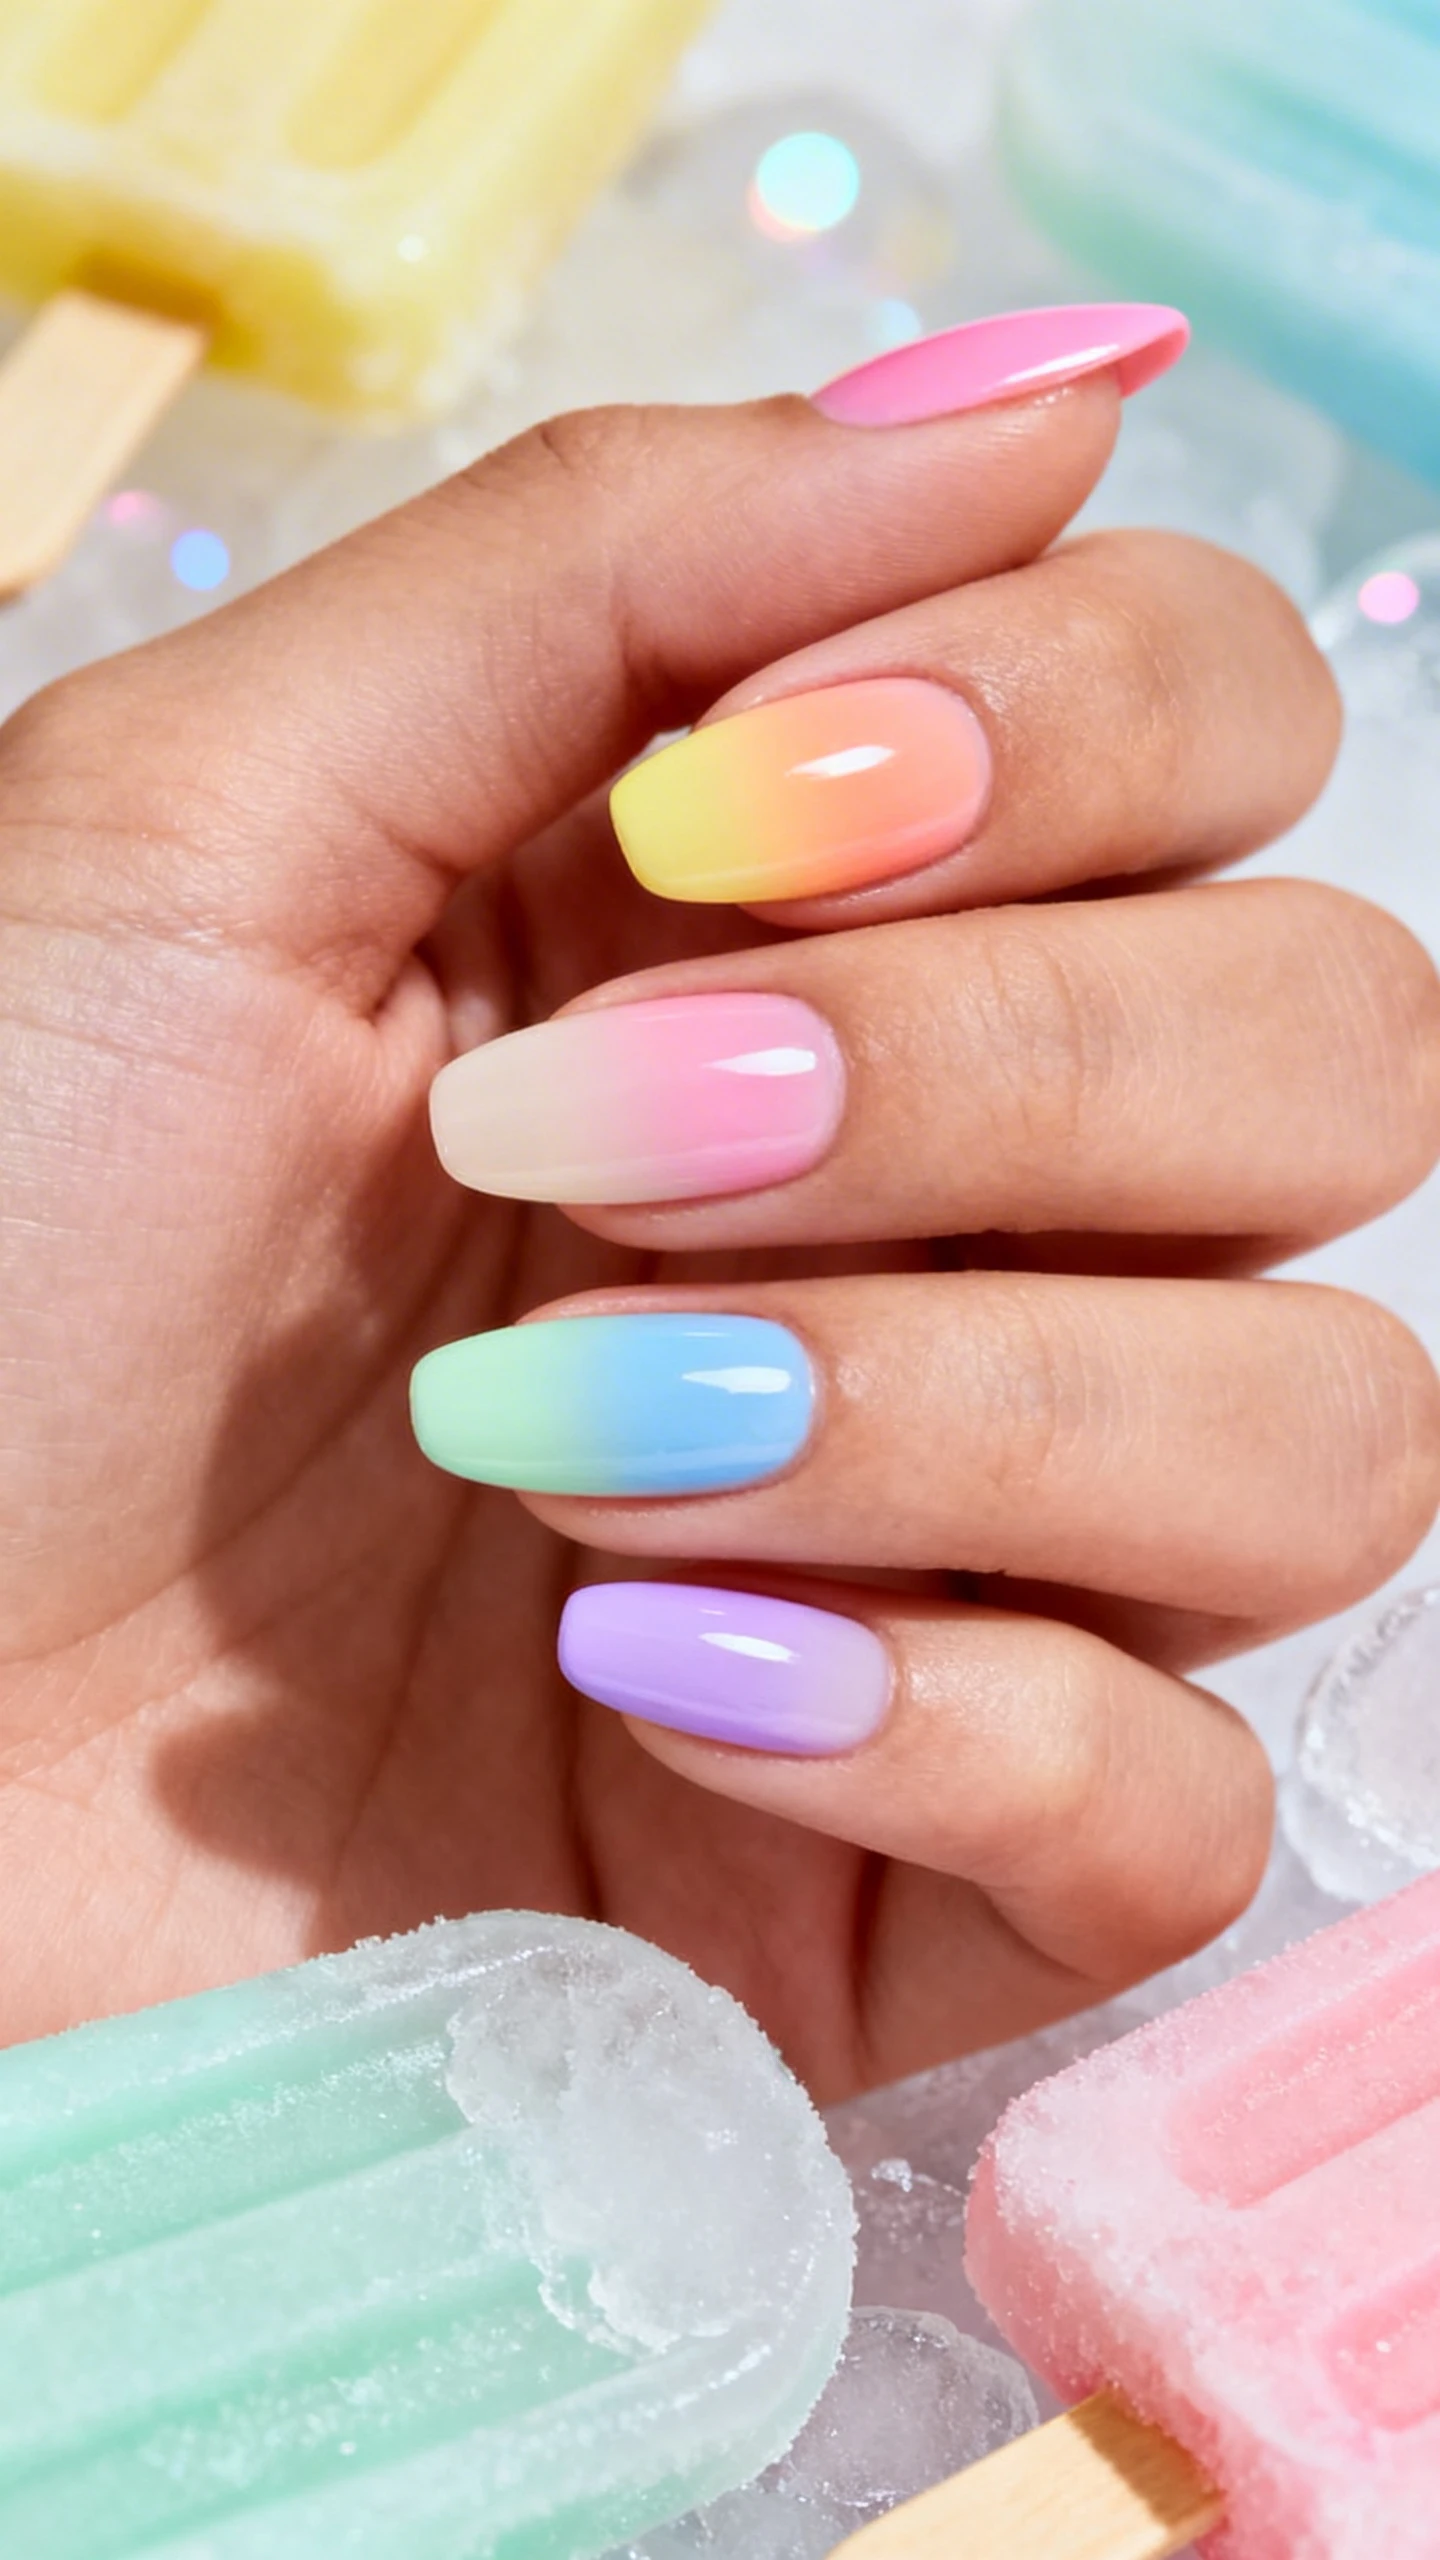
If you love a gradient, this sorbet-inspired ombre brings the sunset to your fingertips—soft transitions from citrusy yellow to peach to pink, or from mint to blue to lilac. It’s low on detail but high on impact, and pastel gels blend beautifully because their pigments are soft. A velvety finish gives it a dreamy, cloud-like vibe, while a glossy finish turns it juicy.
This style elongates the nails and pairs perfectly with minimalist jewelry. It’s a great pick if you’re short on time—no tiny lines to fuss over—just smooth blending and a flawless top coat. Choose either warm or cool gradients or alternate for a rainbow effect.
Blend Like a Pro
Use a small, fluffy gel brush to feather colors before curing. Work in thin layers, building intensity slowly to avoid harsh bands.
Nail Details:
– Shape: Medium almond or coffin for maximum gradient payoff.
– Base: thin sheer cream to even the tone.
– Gradient options:
– Warm set: lemon at the cuticle fading into peach in the center, blending to soft pink at the tip.
– Cool set: mint at the cuticle fading into sky blue in the center, blending to lilac at the tip.
– Placement: alternate warm and cool gradients across the hand for a rainbow sorbet effect, or keep all warm on one hand and all cool on the other.
– Transition: feathered blend with no harsh lines; the middle tone is the softest area to unify shades.
– Accent sparkle: one ultra-fine vertical line of silver micro-glitter down the center of the ring finger to mimic a sunbeam.
– Finish: either
– Velvet matte top coat for a cloud-soft finish, or
– High-shine top coat for a juicy sorbet glow.
– Overall effect: smooth, airbrushed ombre in delicate pastel tones, evenly blended from cuticle to tip.
5. Bunny Trails Pastel Swirls

Abstract swirls in sugared shades feel whimsical, like playful “bunny trails” winding across your nails. The movement keeps it fun for Easter, but the palette remains chic and wearable. This is a great way to showcase multiple colors from a single pastel bundle without going full rainbow on each nail.
Swirls are forgiving and endlessly customizable—thick, thin, double-lined, or gently overlapping. Vary the direction from nail to nail so the design feels dynamic. To maintain elegance, limit it to two or three tones per nail and keep a consistent negative-space ratio.
Balance Is Everything
Anchor your swirls by repeating at least one shade across every nail. The eye will read the set as cohesive even if the layouts differ.
Nail Details:
– Shape: Medium long oval or almond to emphasize the flow of the lines.
– Base: sheer, glossy cream on all nails.
– Color story: pastel lilac, baby blue, soft coral pink, mint, and pale lemon.
– Pattern:
– Each nail features 2–3 swirls that curve from one sidewall toward the opposite tip in gentle S-shapes.
– On the thumb and middle fingers: a wider lilac swirl layered with a thinner mint ribbon running parallel, with a fine white outline shadowing the outer edge of the lilac for crispness.
– On the index and ring fingers: baby blue and soft coral pink swirls that overlap slightly near the center, with small gaps of negative space between lines.
– On the pinky: a single, bold lemon curve with a delicate white micro-line hugging the inner edge.
– Opacity: swirls are slightly sheer for a translucent, glass-paint effect; outlines are opaque white and very thin.
– Accents: one or two micro silver flakes placed where swirls intersect for a twinkle.
– Finish: ultra-glossy top coat to enhance the glassy transparency and smooth the layered lines.
Tools and Techniques You’ll Want Handy
- Detail brush set: thin liner and short detail brush for stripes, petals, and outlines.
- Dotting tool: for centers of flowers and controlled speckles.
- Makeup sponge or ombre brush: for soft, even gradients.
- Cleanup brush + acetone-free cleanser: crisp edges are everything.
- Base coat + top coat: a rubber base helps with self-leveling; choose glossy or velvet matte to finish.

- High-Quality Press-On Nail Kit: All Glamnetic Press-On Nail Sets offer high-quality salon style and feature protective U…
- French Top Natural Almond Nails – Each nail features a tapered fit towards the cuticle to give you the most natural look…
- Premium Durability with Up To 2 Weeks Per Wear – High-quality is our middle name. This customizable nail set can be trim…
Prep Like a Pro for Long-Lasting Gel
- Shape, then gently buff to remove surface shine—no over-buffing.
- Dehydrate nails with alcohol, then apply a thin base coat and cure fully.
- Keep every gel layer thin and cap the free edge to prevent early chips.
- Wipe inhibition layer only when required by your system—check your brand’s instructions.
Color Pairing Cheat Sheet
- Cool harmony: lilac + sky blue + mint.
- Warm harmony: lemon + peach + petal pink.
- Balanced: pick one cool, one warm, and one neutral pastel (like cream) as a bridge.
Remember: the secret to an editorial finish is restraint and repeat. Even playful art looks elevated when you repeat a detail—like a white outline or a single glitter accent—across the set.
Troubleshooting Common Gel Art Issues
- Uneven lines: float the brush and use your pinky as a brace; rotate the finger instead of chasing the curve.
- Patchy opacity: apply two ultra-thin coats rather than one thick one; pastels look smoother in layers.
- Speckles smearing: cure the base color fully, speckle gently, flash cure, then top coat.
- Ombre banding: overlap colors at least one-third of the nail; feather with a nearly dry brush before curing.
Care Tips to Make Your Mani Last
- Oil your cuticles daily to prevent lifting at the edges.
- Use gloves for cleaning—detergents dull shine faster than you think.
- File tiny snags right away and reseal with top coat if needed.
With a good pastel gel bundle, you can create art that feels cohesive and intentional—every color is already curated to play well with the others. Whether you fall for the speckled “candy egg” charm, crisp gingham tips, romantic florals, dreamy ombre, or whimsical swirls, these designs bring the joy of Easter to your fingertips without sacrificing style. Pick one and make it your signature for the season—or rotate them weekly and let your nails be the sweetest part of spring.